As bird owners, seeing our beloved little companions get hurt is one of our biggest fears. I want to share a truly inspiring recovery story from a fellow bird lover. It is a powerful reminder of how resilient these small creatures can be when given disciplined, proper care.
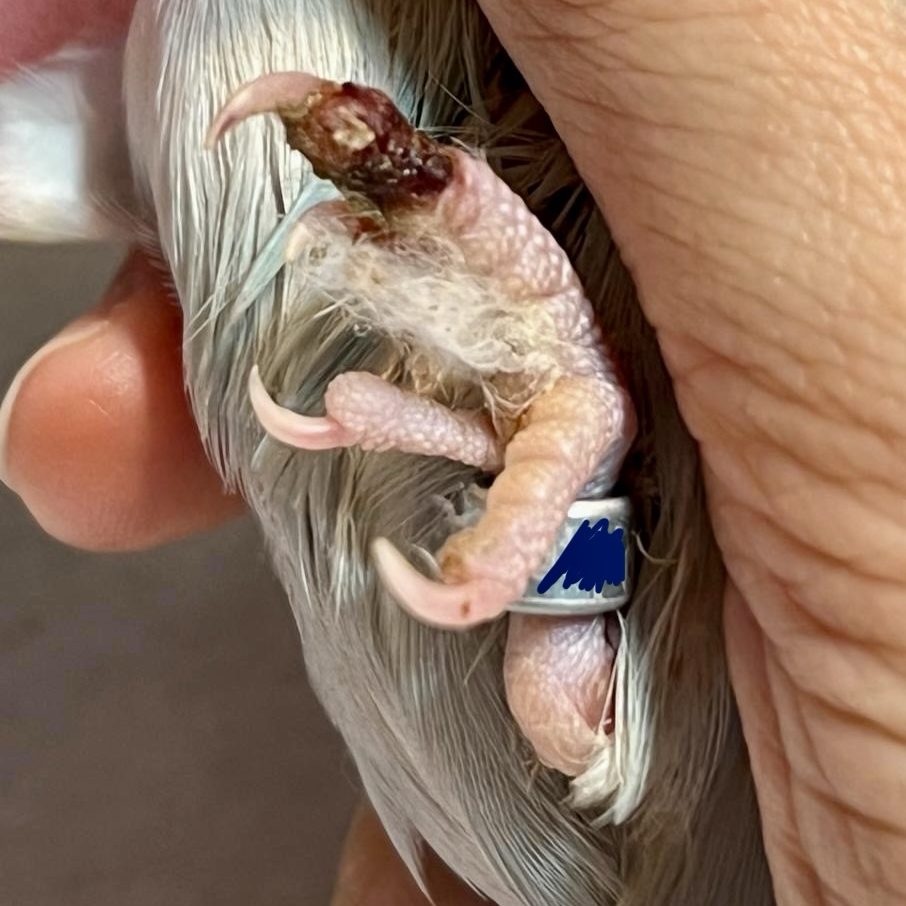
This is the story of Jokul, a lovebird who suffered a severe toe injury. The tissue had turned completely black and necrotic (dead). While it seemed like amputation was the only choice, Jokul daddy committed to a strict, careful wound care routine at home. Against all odds, the dead tissue eventually detached on its own, healthy new pink tissue formed underneath, and Jokul fully recovered – completely saving his toe without surgery.
‼️However, this protocol does not replace professional veterinary care. Please consult your veterinarian as soon as possible.”
This case proves that strict hygiene, patience, and following the correct order of care can work wonders. Here is the exact step-by-step care protocol shared by Jokul’s daddy.
🛠️ The #1 Golden Rule & Material Checklist
⚠️ The Absolute Golden Rule
Never let tap water, boiled water, distilled water, or any non-sterile liquid touch the wound. Only use 0.9% sterile saline from a freshly opened individual pack to clean the wound or dilute the antiseptic. Ordinary water carries hidden bacteria that can easily cause a deep, dangerous infection.
Materials to Gather:
- Hygiene: Fragrance-free liquid hand soap and disposable gloves (nitrile or latex).
- Liquids: At least 4 unopened individual packs of 0.9% Sterile Saline (2 for rinsing, 1 for dilution, 1 spare) and 10% Povidone-iodine (Betadine).
- Tools: Individually wrapped sterile gauze pads (at least 10), a clean towel to gently hold your bird, a syringe or dropper (optional, for gentle rinsing), and a small sterile container (or a small dish washed thoroughly with dish soap and rinsed with boiling water).
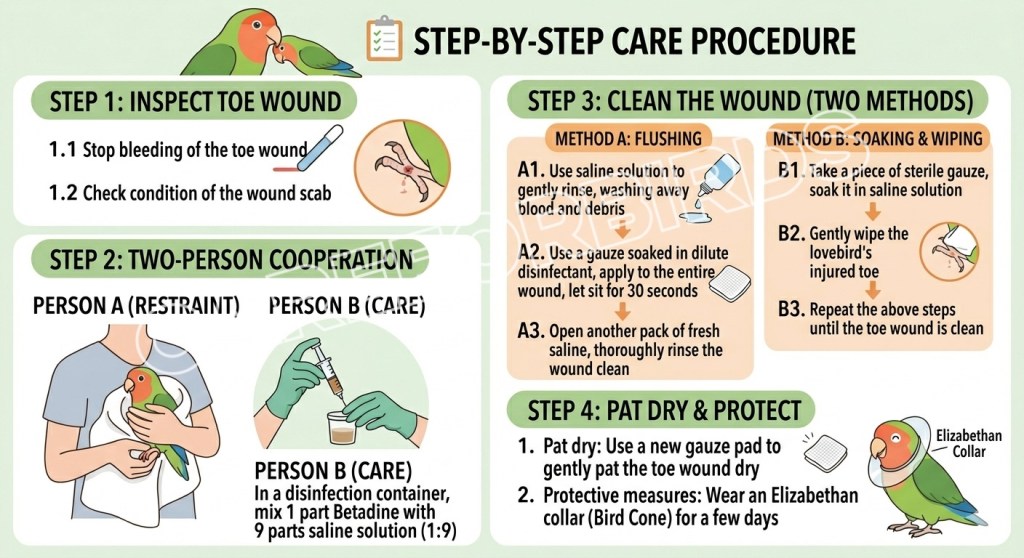
📋 The Step-by-Step Care Protocol
Step 1: Inspection (Do NOT Wash Yet)
Before applying any liquid, you must check two critical things in this exact order: bleeding and the scab.
A. Stop All Bleeding First
- Is the wound actively oozing, dripping, or bleeding?
- 🔴 YES: Take a dry sterile gauze pad and apply continuous, gentle pressure directly to the wound. Do not lift the gauze or peek until you are sure the blood has clotted. You can use styptic powder if needed. Keep pressing until the bleeding stops completely.
- 🟢 NO: Move on to check the scab.
- Important Note: Never wash a bleeding wound. Rinsing it will wash away the body’s natural clotting factors and cause it to bleed all over again.
B. Check the Scab Condition
- Stable Scab: Dry, firmly attached to the skin, no fluid leaking underneath, and the edges are not lifting.
- Unstable Scab: Soft, cracked, oozing clear fluid or pus, and the edges are starting to peel up.
Step 2: The Two-Person Setup (Hold & Prepare)
Handling a hurt bird requires a gentle but steady hand. It is highly recommended to do this with two people.
- Person A (The Holder): Gently wrap your bird in a clean towel. Support their body securely against your chest while gently holding out the injured leg. Keep them calm and safe.
- Person B (The Caregiver): Wash your hands thoroughly with soap for 20 seconds, put on your gloves, and mix the 1:9 diluted Betadine solution:
- Open a fresh pack of sterile saline.
- Mix 1 part Betadine with 9 parts sterile saline in your clean container (for example: 1 mL of Betadine + 9 mL of saline).
Step 3: Clean the Wound (Choose Method A or B)
Depending on how dirty the wound is and how stressed your bird is, choose one of these two gentle cleaning methods:
Method A: The 3-Flush Method (Best if your bird is in high pain or distress)
Use this method if the wound is relatively clean but your bird is too stressed or painful to be touched directly. This is a hands-off, gentle rinse. Do not scrub.
- The First Rinse (Saline Only): Open a fresh pack of sterile saline and gently stream it over the wound from about 2–3 cm away to wash away loose blood and debris.
- The Antiseptic Rinse (Diluted Betadine): Use a syringe or a soaked gauze pad to drip your prepared 1:9 Betadine mix over the whole wound. Let it sit for 30 seconds to kill bacteria.
- The Final Rinse (Saline Again): Open another fresh pack of sterile saline and rinse the wound thoroughly. It is vital to wash away the remaining Betadine, because if left on the skin, it can actually slow down healing.
- Tip: Between rinses, use a fresh sterile gauze pad to gently dab and absorb excess pooling liquid. Never wipe.
Method B: The Dip and Clean Method (Preferred for dirty wounds)
Use this method if you need to carefully remove stubborn dirt, dried blood, or loose crust.
- Pour a little sterile saline from a fresh pack into your clean container.
- Take a fresh piece of sterile gauze and dip it into the saline (or the diluted Betadine if there is heavy dirt).
- The Right Technique: Start on the healthy skin just outside the wound, and gently wipe in a straight line inward toward the center of the wound. Do not rub back and forth.
- The Golden Rule: One dip, one wipe, one gauze. Throw the gauze away immediately after a single swipe. Never double-dip a used gauze back into your clean liquid.
- Repeat with a fresh gauze until the wound is clean. If it starts to bleed, stop immediately and return to Step 1.
- Finish with a quick rinse of pure saline to remove any leftover Betadine.
Step 4: Dry and Protect
- Pat Dry: Gently pat the wound dry with a completely fresh, dry sterile gauze pad.
- Protect: Your bird may need to wear a temporary Elizabeth collar (bird cone) for a few days to stop them from picking or biting at the healing toe.
📈 Care Schedule & What Success Looks Like
Consistency is the secret to helping your bird heal. Follow this daily routine:
- Days 1 to 3 (Acute Phase): Clean the wound 2–3 times everyday (Check for bleeding➡️ Clean gently➡️ Rinse ➡️Dry).
- Day 4 Onwards (Healing Phase): Once the scab looks stable or you can see healthy pink tissue peeking through, reduce the care routine to 1 time everyday.
🌟 Signs of Healing to Watch For:
Keep a close eye on the wound! You are on the right track if you notice:
- The dark scab begins to shrink or naturally flakes off on its own.
- Bright pink or red, healthy new tissue forms underneath the old scab.
- The toe slowly regains its normal, healthy shape and natural colour.
Jokul’s incredible recovery demonstrates that with unwavering patience, meticulous hygiene, and a disciplined approach, severe avian injuries can heal remarkably well without invasive surgery.
If the wound shows signs of worsening infection (such as foul odor, spreading redness, or extreme lethargy), seeking immediate veterinary care remains paramount.
⚠️Disclaimer: This guide is not a substitute for professional vet care. Consult a vet immediately.
